
Your graphics add a nice touch to my presentations and I recently used them for one of my all-hands meetings. Your toolbox adds professionalism to my slides. Instead of using standard clipart.
Claude Jones, Director of Engineer, @Walmartlabs, USA

Your graphics add a nice touch to my presentations and I recently used them for one of my all-hands meetings. Your toolbox adds professionalism to my slides. Instead of using standard clipart.
Claude Jones, Director of Engineer, @Walmartlabs, USA
I needed a fresh look at some of my slides. I've tried to find a way to create a paintbrush effect, to underline, accentuate, add some color and the handwritten markers were just the things. Very easy to use, easy to size, change the color. It was an affordable, perfect solution and I'm happy to recommend it.
Anonymous, US
The crisp, clean look of the graphics, and the fact that it allowed me to easily edit and change the colors to match the template was my main reason for purchasing them.
Brandie Jenkins, E-learning Developer, USA
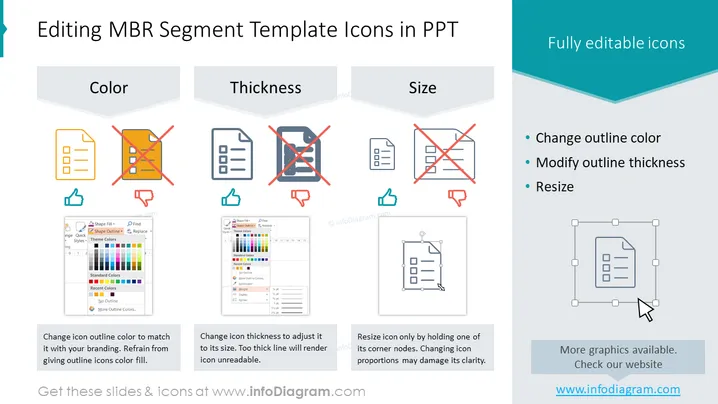
Die PowerPoint-Folie trägt den Titel "Bearbeiten von MBR-Segmentvorlagen-Symbolen in PPT" und dreht sich um die Anpassung von Symbolen in PowerPoint. Sie bietet Anleitungen, wie man die Farbe, Dicke und Größe der Symbolumrandungen ändern kann, um sie an spezifische Präsentationsbedürfnisse anzupassen.
Das erste Konzept, 'Farbe', schlägt vor, die Umrandungsfarben von Symbolen zu ändern, um sie mit der Markenidentität in Einklang zu bringen, rät jedoch davon ab, Symbole mit Farbe zu füllen, um die Klarheit zu erhalten. 'Dicke' betont, dass man die Linienstärke der Symbole zur Lesbarkeit anpassen sollte und warnt, dass zu dicke Linien Symbole unleserlich machen können. Schließlich weist 'Größe' an, dass man Symbole nur durch Anpassen der Eckenknoten in der Größe ändern sollte, um das Seitenverhältnis und die Klarheit zu bewahren.