Your graphics add a nice touch to my presentations and I recently used them for one of my all-hands meetings. Your toolbox adds professionalism to my slides. Instead of using standard clipart.
Claude Jones, Director of Engineer, @Walmartlabs, USA
Your graphics add a nice touch to my presentations and I recently used them for one of my all-hands meetings. Your toolbox adds professionalism to my slides. Instead of using standard clipart.
Claude Jones, Director of Engineer, @Walmartlabs, USA
I needed a fresh look at some of my slides. I've tried to find a way to create a paintbrush effect, to underline, accentuate, add some color and the handwritten markers were just the things. Very easy to use, easy to size, change the color. It was an affordable, perfect solution and I'm happy to recommend it.
Anonymous, US
The crisp, clean look of the graphics, and the fact that it allowed me to easily edit and change the colors to match the template was my main reason for purchasing them.
Brandie Jenkins, E-learning Developer, USA
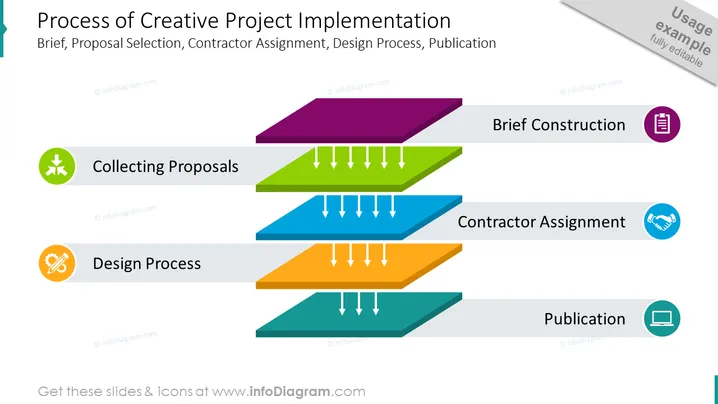
La diapositive illustre les étapes d'un processus de mise en œuvre de projet créatif. Elle commence par "Collecte de Propositions," qui implique probablement de rassembler diverses idées ou soumissions de projet. Cela est suivi par "Construction du Cahier des Charges," où un plan détaillé ou une proposition est élaboré. Ensuite, dans la séquence, se trouve "Attribution du Contractant," signifiant la sélection d'une partie pour exécuter le projet. La phase avant-dernière est le "Processus de Conception," indiquant l'étape où le projet prend forme et se développe. La dernière étape est "Publication," marquant l'achèvement et la distribution du projet.
La diapositive a une apparence structurée, professionnelle, mais dynamique grâce à ses barres 3D et son code couleur qui guide le spectateur à travers les étapes du processus de projet. L'utilisation d'icônes et de flèches directionnelles crée un flux facile à suivre et visuellement engageant.