Your graphics add a nice touch to my presentations and I recently used them for one of my all-hands meetings. Your toolbox adds professionalism to my slides. Instead of using standard clipart.
Claude Jones, Director of Engineer, @Walmartlabs, USA
Your graphics add a nice touch to my presentations and I recently used them for one of my all-hands meetings. Your toolbox adds professionalism to my slides. Instead of using standard clipart.
Claude Jones, Director of Engineer, @Walmartlabs, USA
I needed a fresh look at some of my slides. I've tried to find a way to create a paintbrush effect, to underline, accentuate, add some color and the handwritten markers were just the things. Very easy to use, easy to size, change the color. It was an affordable, perfect solution and I'm happy to recommend it.
Anonymous, US
The crisp, clean look of the graphics, and the fact that it allowed me to easily edit and change the colors to match the template was my main reason for purchasing them.
Brandie Jenkins, E-learning Developer, USA
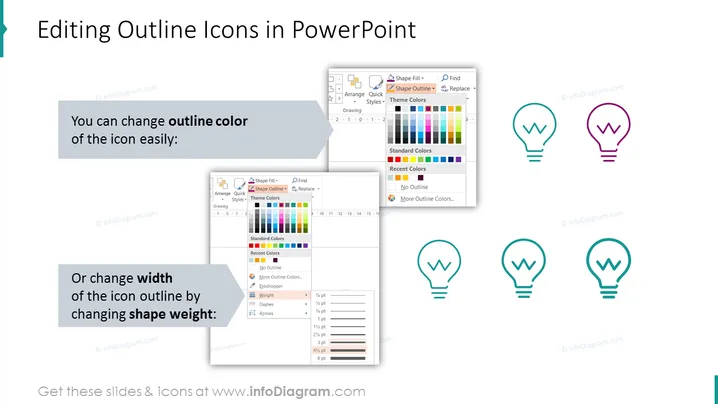
La diapositive explique comment personnaliser les icônes de contour dans PowerPoint en modifiant la couleur du contour et la largeur du contour, ce qui signifie respectivement changer la couleur entourant les bords de l'icône et ajuster l'épaisseur ou la finesse de ces bords. Elle utilise un exemple d'icône d'ampoule pour démontrer ces changements. Pour la couleur du contour, elle affiche une palette déroulante "Couleurs du thème" avec des options, tandis que pour la largeur du contour, elle illustre une option "Poids" avec différentes tailles de points.
La diapositive a un design professionnel et éducatif, utilisant des captures d'écran et des icônes d'exemple pour représenter visuellement les instructions. Elle est simple, mais communique efficacement le processus de personnalisation avec un texte minimal et des graphiques de soutien.