
Your graphics add a nice touch to my presentations and I recently used them for one of my all-hands meetings. Your toolbox adds professionalism to my slides. Instead of using standard clipart.
Claude Jones, Director of Engineer, @Walmartlabs, USA

Your graphics add a nice touch to my presentations and I recently used them for one of my all-hands meetings. Your toolbox adds professionalism to my slides. Instead of using standard clipart.
Claude Jones, Director of Engineer, @Walmartlabs, USA
I needed a fresh look at some of my slides. I've tried to find a way to create a paintbrush effect, to underline, accentuate, add some color and the handwritten markers were just the things. Very easy to use, easy to size, change the color. It was an affordable, perfect solution and I'm happy to recommend it.
Anonymous, US
The crisp, clean look of the graphics, and the fact that it allowed me to easily edit and change the colors to match the template was my main reason for purchasing them.
Brandie Jenkins, E-learning Developer, USA
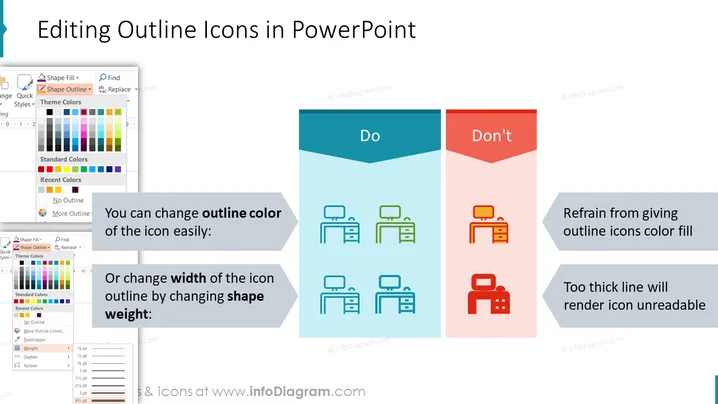
Die Folie handelt von "Bearbeiten von Umriss-Icons in PowerPoint" und veranschaulicht die Dos und Don'ts beim Ändern von Umriss-Icons. Sie schlägt vor, dass die Umrissfarbe von Icons leicht geändert werden kann, um unterschiedlichen Designbedürfnissen gerecht zu werden, und erklärt, dass das visuelle Gewicht des Icons durch Ändern der Umrissdicke angepasst werden kann. Es wird geraten, auf das Hinzufügen von Farbfüllungen zu Umriss-Icons zu verzichten, da dies das Icon unleserlich machen könnte, und es wird vor der Verwendung von zu dicken Linien gewarnt, die das Icon ebenfalls unklar machen könnten.
Die Folie verwendet kontrastierende Farben und ein ausgewogenes Design, um visuell die richtigen und falschen Möglichkeiten zur Änderung von Umriss-Icons zu vergleichen.