Your graphics add a nice touch to my presentations and I recently used them for one of my all-hands meetings. Your toolbox adds professionalism to my slides. Instead of using standard clipart.
Claude Jones, Director of Engineer, @Walmartlabs, USA
Your graphics add a nice touch to my presentations and I recently used them for one of my all-hands meetings. Your toolbox adds professionalism to my slides. Instead of using standard clipart.
Claude Jones, Director of Engineer, @Walmartlabs, USA
I needed a fresh look at some of my slides. I've tried to find a way to create a paintbrush effect, to underline, accentuate, add some color and the handwritten markers were just the things. Very easy to use, easy to size, change the color. It was an affordable, perfect solution and I'm happy to recommend it.
Anonymous, US
The crisp, clean look of the graphics, and the fact that it allowed me to easily edit and change the colors to match the template was my main reason for purchasing them.
Brandie Jenkins, E-learning Developer, USA
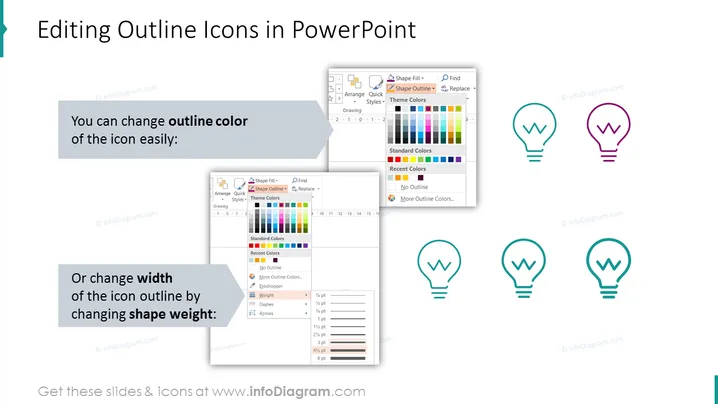
Die Folie erklärt, wie man Umrisssymbole in PowerPoint anpassen kann, indem man die Umrissfarbe und die Umrissbreite ändert, was jeweils bedeutet, die Farbe rund um die Kanten des Symbols zu ändern und die Dicke oder Dünne dieser Kanten anzupassen. Sie verwendet ein Beispiel eines Glühbirnensymbols, um diese Änderungen zu demonstrieren. Für die Umrissfarbe zeigt sie eine Auswahlpalette "Theme Colors" mit Optionen, während sie für die Umrissbreite eine "Weight"-Option mit verschiedenen Punktgrößen veranschaulicht.
Die Folie hat ein professionelles und lehrreiches Design, das Screenshots und Beispielsymbole verwendet, um die Anweisungen visuell darzustellen. Sie ist einfach, kommuniziert jedoch effektiv den Anpassungsprozess mit minimalem Text und unterstützenden Grafiken.